Text Recognition with Jetpack Compose and CameraX
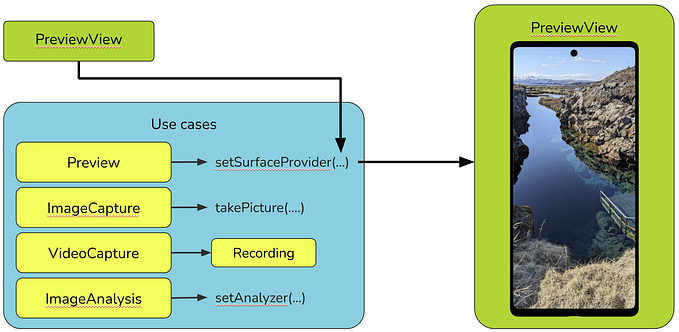
Implementing CameraX while using Jetpack Compose can be a bit challenging because some of the views, like PreviewView, that provide the surface upon which the camera preview is displayed are not available for Jetpack Compose. However, there are ways to work around this.
Here is a simple to follow guide that helped me implement CameraX in Jetpack Compose with an image analysis use case:
- Add dependencies
To make use of the CameraX library in our project, we first need to add the required dependencies. To do this, open the app level build.gradle file and add the following lines to the dependencies section:
implementation "androidx.camera:camera-camera2:1.2.3"
implementation "androidx.camera:camera-lifecycle:1.2.3"
implementation "androidx.camera:camera-view:1.3.0-beta01"

implementation 'com.google.mlkit:vision-common:17.3.0'
implementation 'com.google.android.gms:play-services-mlkit-text-recognition-common:19.0.0'
implementation 'com.google.android.gms:play-services-mlkit-text-recognition:19.0.0'
Update the Gradle files and wait for the Gradle build to complete.
2. Add the camera permission to the manifest file
<uses-permission android:name="android.permission.CAMERA" />3. Add the uses camera features tag which requests the android system for the app to use the camera.
<uses-feature
   android:name="android.hardware.camera"
   android:required="true" />
4. Create the CameraScreen composable
@Composable
fun CameraScreen() {
   val context = LocalContext.current
   val previewView: PreviewView = remember { PreviewView(context) }

   Box(modifier = Modifier.fillMaxSize()) {
       AndroidView(factory = { previewView }, modifier = Modifier.fillMaxSize())
       IconButton(modifier = Modifier
           .align(Alignment.BottomCenter)
           .padding(16.dp),
           onClick = { /*TODO*/ }) {
           Icon(
               painter = painterResource(id = R.drawable.baseline_camera_24),
               contentDescription = "",
               tint = MaterialTheme.colorScheme.primary,
               modifier = Modifier.size(54.dp)
               )
           }
       }
}
5. Create a LifecycleCameraController object and store it in the variable cameraController
val cameraController = remember { LifecycleCameraController(context) }6. Get the view lifecycle owner and store it in the variable lifecycleOwner.
val lifecycleOwner = LocalLifecycleOwner.current7. Bind the camera controller to the view lifecycle owner by calling cameraController.bindToLifecycle(lifecycleOwner).
cameraController.bindToLifecycle(lifecycleOwner)8. Select a camera by calling cameraController.cameraSelector = CameraSelector.DEFAULT_BACK_CAMERA
cameraController.cameraSelector = CameraSelector.DEFAULT_BACK_CAMERA9. Attach the controller to the previewView
previewView.controller = cameraController10. Create an executor that will perform the task of extracting text from images.Create an executor that will perform the task of extracting text from images.
val executor = remember { Executors.newSingleThreadExecutor() }11. The captured image can be extracted from the imageProxy by using the cameraController.setImageAnalysisAnalyzer analyzer as below;
cameraController.setImageAnalysisAnalyzer(executor) { imageProxy ->
   imageProxy.image?.let { image ->
       val img = InputImage.fromMediaImage(
           image,
           imageProxy.imageInfo.rotationDegrees
       )
   }
}
12.Initialize the text recognizer by calling the getClient method of the TextRecognition class with the TextRecognizerOptions.DEFAULT_OPTIONS constant. This will create a new text recognizer client that can be used to recognize text from images.
val textRecognizer =
   remember { TextRecognition.getClient(TextRecognizerOptions.DEFAULT_OPTIONS) }
13. Initialize the text variable where we shall store our extracted text
var text by rememberSaveable {
   mutableStateOf("")
}
14. Next, we call the process method of our text recognizer with the image, and listen for it to complete. Once it is complete, we can get the text from the result, and then close the imageProxy and clear the imageAnalyzer.
textRecognizer.process(img).addOnCompleteListener { task ->
  if (!task.isSuccessful) {
    text = task.exception!!.localizedMessage.toString()
  } else {
    text = task.result.text
  }


  cameraController.clearImageAnalysisAnalyzer()
  imageProxy.close()
}
15. In the next step, we will create a simple dialog to display the scanned text.
if (text.isNotEmpty()) {
   Dialog(onDismissRequest = { text = "" }) {
       Card {
           Text(
               text = text,
               modifier = Modifier.padding(16.dp),
               style = MaterialTheme.typography.bodySmall
           )
           Spacer(modifier = Modifier.height(16.dp))
           Button(onClick = { text = "" }) {
               Text(text = "Done")


           }
       }
   }
}
At this point your CameraScreen composable function should look something like this
@androidx.annotation.OptIn(ExperimentalGetImage::class)
@Composable
fun CameraScreen() {
    val context = LocalContext.current
    val previewView: PreviewView = remember { PreviewView(context) }
    val cameraController = remember { LifecycleCameraController(context) }
    val lifecycleOwner = LocalLifecycleOwner.current
    cameraController.bindToLifecycle(lifecycleOwner)
    cameraController.cameraSelector = CameraSelector.DEFAULT_BACK_CAMERA
    previewView.controller = cameraController

    val executor = remember { Executors.newSingleThreadExecutor() }
    val textRecognizer = remember { TextRecognition.getClient(TextRecognizerOptions.DEFAULT_OPTIONS) }

    var text by rememberSaveable {
        mutableStateOf("")
    }
    var isLoading by remember { mutableStateOf(false) }

    Box(modifier = Modifier.fillMaxSize()) {
        AndroidView(factory = { previewView }, modifier = Modifier.fillMaxSize())

        // Show loading indicator when isLoading is true
        if (isLoading) {
            CircularProgressIndicator(
                modifier = Modifier
                    .size(50.dp)
                    .align(Alignment.Center)
            )
        } else {
            IconButton(
                modifier = Modifier
                    .align(Alignment.BottomCenter)
                    .padding(16.dp),
                onClick = {
                    isLoading = true
                    cameraController.setImageAnalysisAnalyzer(executor) { imageProxy ->
                        imageProxy.image?.let { image ->
                            val img = InputImage.fromMediaImage(
                                image,
                                imageProxy.imageInfo.rotationDegrees
                            )

                            textRecognizer.process(img).addOnCompleteListener { task ->
                                isLoading = false
                                text = if (!task.isSuccessful) task.exception!!.localizedMessage.toString()
                                else task.result.text

                                cameraController.clearImageAnalysisAnalyzer()
                                imageProxy.close()
                            }
                        }
                    }
                }
            ) {
                Icon(
                    painter = painterResource(id = R.drawable.baseline_camera_24),
                    contentDescription = "",
                    tint = MaterialTheme.colorScheme.primary,
                    modifier = Modifier.size(54.dp)
                )
            }
        }
    }

    if (text.isNotEmpty()) {
        Dialog(onDismissRequest = { text = "" }) {
            Card(modifier = Modifier.fillMaxWidth(0.8f)) {
                Text(
                    text = text,
                    modifier = Modifier.padding(horizontal = 16.dp).padding(top = 16.dp),
                    style = MaterialTheme.typography.bodySmall
                )
                Button(
                    onClick = { text = "" },
                    modifier = Modifier.align(Alignment.End).padding(horizontal = 16.dp, vertical = 16.dp)
                ) {
                    Text(text = "Done")
                }
            }
        }
    }
}
I added a loading indicator just to improve the usability of the app to the end user.
I hope this blog post was helpful. If you have any questions, please feel free to leave a comment below. Thanks for reading!
The complete project is available on GitHub. Feel free to fork the project, make changes, and contribute back to the community.
Github: CameraXSample